Showing posts with label ideas. Show all posts

Saturday, 11 November 2017

Planning your work

Planning your work (Photography & Art)

If within your assignment you have a requirement to plan - the following guidance may be helpful.

Dependent on what course you're doing there will be several units that require that you identify that you have planned parts of your work, there may also be a component that asks for you to clarify your intentions.

Planning should be identified at all stages when you undertake the production of work... Photography or Art. I would always suggest that you do this within an organised format based on the Gibbs Reflective Practice method (See here for details or in the sidebar to the right).

Use these prompts below to generate your plan

1. Clarify (Describe) what the intention is e.g. why you're making this work, making a direct link with the assignment content.

2. Where - say where your making the images - studio, location, explain why you're doing it there - strengths and weaknesses of the location/studio. Problems you might encounter what you'll do in advance to alleviate those problems. 

3. When - The date, time, explain why at that time, especially if on location - as the light will be dramatically different at different times of day. Be as technical as you can when talking about the light. Write about the time in terms of urgency and the assignment deadline.

4. What with - What camera and equipment are you using, what focal length lens, what tripod, what additional equipment will you need - will you have a back-up camera? Use a check-list in your book, have everything on the check-list - Empty SD card, charged batteries, additional batteries and SD cards. Tripod plates, cables, hotshoe adapters, light meters, extension leads, flash heads and other studio kit (Use the names/brands of the equipment).

5. How (Technique) - Explain how you're going to shoot the images, what approach will you use, how do you want it to look? Is it going to like or borrow something of a famous photographers style or technique? How are you going to ensure that you get the exposures right - what method will you use to do your light readings - maybe explain what metering pattern you use and say why. What are you going to do about your backgrounds? Do your backgrounds play an important part in the images visual language/narrative? How are you going to use the back-grounds - out of focus or in focus? How do you intend to use depth of field generally? What shutter speed will you hope to be using and why? What white balance will you use and why? What file type will you use and why?

6. Who with - Models, assistants, make-up artist, stylists, drivers etc. Who will you use as the model, could you find models? Are you using the same model again and again - why? Do you think that when you show your folio to prospective employers or Universities they might view this negatively? Have you used anyone else to style it or do any of the other roles in photography - see the image below of a Location shoot I witnessed as well as the photographer and the 1 model (Yasmin Le Bonn) there were at least 12 other people... Stylists, Make-up artists, hair-stylists, 4 x assistants, art director. Could your images be improved with more effort and attention to detail?
Whoever you do involve - say what their role is going to be as part of your plan.

7. Using what light Before you shoot, you should have some idea of the kind of light you want, what do you want the light to do - define shape, form and texture, or do you want light that wraps around the subject with low contrast? Again, make connections with other photographers work... I want to get the same effect as photographer a and b and write about the light using the correct terminology. With the light you should write about the time of day and weather and what you're hoping for - you could support this with weather reports - with images of charts showing the weather you'll probably get and then also include a weather contingency plan.

With the light - if you're in the studio use a floor plan diagram and add images or diagrams of the lighting equipment you're going to use and explain why and what effect this might have on the outcome.

8. Health and Safety Many of the units have a requirement to address H&S, so within your plan make sure you write about the H&S aspects that you have to deal with and explain what you do to ensure you, your model and any others that are involved in your shoot are also safe.

9. Weather Mentioned earlier - the weather has a massive effect on location shoots, you might want a particular type of light for your shoot that meets your creative intentions if the light isn't right, explain what you'll do to deal with the light being not quite what you want.


Finally, if you've looked at this check list and thought "What the hell"? because, you don't usually think of or include much of the above, that means at the end of the assignment when you write up your reflection/evaluation and detail what more you need to learn in order to improve you can mention some of the above.

Wednesday, 4 November 2015

Simple ten minute digital project - 3D - David Hockney based project

Joiner Ideas, guidance and links for 'David Hockney 3D Project'.

Within the first year one of the units is around exploring the idea of three dimensional work using photography. At the start of this unit we look at David Hockney. Watch the video below, make notes and focus on what he says about the ideas relating to the 3D aspects of this approach. Use the HTML link from the video and this blog now because you've used it as part of your research.

Also look in your text books I'm pretty certain there's a page in the book Photography the Whole Story.


You will be told to use different types of film as part of the current units you're working on. One of them is ILFORD XP2 which you may be able to buy locally at Boots or Snappy Snaps near the college. Don't leave it though till the last minute start looking now. *Note, XP2 will have to be processed at Snappy Snaps or Boots not here at college. Look at the link above and there's some information you can include in your book along with a lot more detail in the product information link.

The other film you must use is Ilford FP4 + This is a film you can buy in college and will have to process yourself. The processing for this film using Rodinal will be 9 minutes. Ask if you're in doubt.

With one of these film you're strongly advised to shoot a contact sheet joiner...
 
https://s-media-cache-ak0.pinimg.com/736x/b8/47/ab/b847abb293b867817fd754b78c24cc99.jpg

I would advise to shoot it in a sequence where you shoot 5 frames per line not six as in this image. Practice it first using your digital camera first...
Again shoot left to right 5 frames at a time gradually working down your subject. You'll need 6 or 7 rows. Then in windows on a PC adjust the view so that it cramps the images so that they line up in rows of 5 and then capture it using print screen and paste into MS Paint to create your digital file.

With all of these tests and trials - write up a plan for the work before you do it and record what materials you're using.

Thursday, 30 January 2014

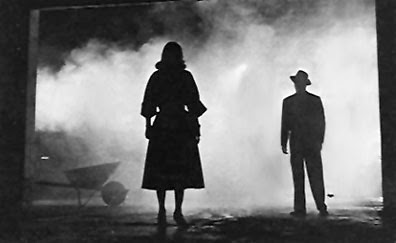
Studio lighting Film Noir Gloom

http://www.listofphotographers.blogspot.co.uk/

This is the last of the lighting sessions where we've been exploring lighting with a Film Noir/Horror theme. Again using chiaruscoro techniques (Single point light) allowing for much of the scene to fall into darkness increasing the sense of gloom. As before, the influence comes from film stills - Nosferatu the vampire (The stair case shadow scene). One of the scenes from the film Noir Classic 'Double Indemnity' and the more recent take on film Noir - 'Sin City'.


The classic 'Staircase' scene from the 1922 German Expressionist film Nosferatu
A scene from the Film Noir classic "Double Indemnity" 1944
 
A scene from the Film Noir inspired Sin City 2005


Friday, 25 October 2013

Typology in photography (How to Ace your A-Level)

How to Ace you A-Level in Photography (And other courses)

TYPOLOGY IN PHOTOGRAPHY
Across the course you need to produce images that use contemporary approaches to making and producing images. These approaches can be construed as experimental in many cases and this identifies one of the key assessment criteria that you need to meet. In addition they take your photography over and above the norm and introduce you to new concepts and ideas and broaden your photographic knowledge.

Again, I'm going to mention that your starting point should be the Journals and magazines in the LRC (Learning resources Centre) and the Forum. You should be looking at the British Journal of Photography, Hotshoe and many more on weekly basis to give you ideas and inspire you. Here's the reason why.


One of your assignments is based around the concept of presenting images as a typologies. The Daddy (And the Mummy) of typology are the Bechers - Bernd and Hiller.

As with all of the projects you need to produce the work over a series of shoots, developing and improving them as you go. At stages (After each shoot perhaps) you should review the work using a method such as the Gibbs reflective practice model to drive the work on and forwards to better results.

You should choose a subject that you like and will be happy to shoot, you need to consider all the other approaches that you've been taught about and tried and look at fusing those ideas with these. Remember the work you produce needs to be experimental in a number of ways and as you produce this work, this experimental aspect could be brought in at each of the developmental stages.

Through research, looking at Journals such as the BJP, Hotshoe etc in the LRC and The Forum you might be in a position whereby you can link the work you're doing to a theme with a deeper meaning to it rather than just a series of images that are relatively meaningless. This is one of the more difficult aspects of any project when completed to tight deadlines and you massively improved the chances of being able to work with a theme of some substance if you're researching work that is made and produced in this way,


Alinka Echevirria – Typology + catholic + catholocism + personal + objects + charms + jewellery + 
Ari Versluis – exactitudes + typology + montage + fashion + skinheads
Candida Hofer – Typology + Public Buildings – Interiors - Categorization
Chris Coekin – Hitch hikers + portraits + roads + location + daylight + types + typology
Danielle Lilley – Cadets + soldiers + typology + portraits + war + stereotype + guns + uniform
David Maisel + decay + landscape + corrosion + environmental + issues + typology + topography + water + colour + xray + horses + skulls
Donavan Wiley – Typology + Northern Ireland + conflict + war + military + deadpan + aerial
Ed Ruscha – Typology + Petrol station + Parking Lots + Streets (Hollywood Bvld) + Aerial
Frank Gohlke – New Topographic + Landscape + Typology + Deadpan + Environment + Passing of Time + Monochrome
James Mollison – typology + monkey + apes + deadpan

The Bechers Youtube link (sub titles). No.1
The Bechers Youtube link  No.2

Jasper White

The Bechers
Jeffrey Milstein
Ed Ruscha
James Mollison

http://typology.ca/typologies-within-typologies-100-abandoned-houses-and-the-heidelberg-project-today/

http://blog.redbubble.com/2012/04/photographic-typologies-the-study-of-types/