Showing posts with label for. Show all posts

Sunday, 19 October 2014

Example of how to respond to a practice based lesson

I'm a massive advocate of the use of the Gibbs Reflective Practice as a method of generating responses to the practical lessons that students participate in.

Students often wonder after a lesson 'What should I now do in response to that lesson and how should I do it'?

Increasingly I'm seeing that the Gibbs method should become an integral part of what students do in response to their lessons. They need to say what they've done, how they've done it, what they've used, why they've used it, how it connects to professional practice and identify what it is they have learned. Through the use of Gibbs, almost all of the required written responses could be generated an in most instances these would meet the assessment criteria.

The example I've identified here uses a lesson I deliver for Fashion students. The students are given a choice of 20 historic and contemporary portraits to choose two from, to act as the stimulus for their own fashion photography images. The image that this particular lesson is based around is Vincent Van Goghs self portrait against a blue background.

The rationale for this approach is that, this image has stood the test of time, the pose and the use of light is by virtue of this being one of the most famous paintings ever, a very fine example for you as the student to draw influence from. Secondly, one of the criteria this work has to meet is one based around having to demonstrate knowledge and use of light in their practice. I therefore put a case that if you study the work and the lighting of the great painters as professionals do, your work will benefit from that study. The next bit is the tricky bit as I have to somehow bring that notion up to-date by cross-referencing an example that uses a similar light source. In this instance I use Corinne Day's 'Under-Exposure' from Vogue 1993..

The following text and images therefore demonstrates how a student might use the Gibbs prompts to generate a response to the lesson.


What Happened?

 One of the images that we were given the option to work with was Vincent Van Goghs self portrait set against a blue background. In this lesson the image was displayed on a tele and as a class we discussed the characteristics of the light. We had to look at the angle of the light, guess what the light source was and describe its characteristics.

 We were then presented with a contemporary photograph by a photographer called Corinne Day. The image comes from a set of images from a series called ‘Under exposed’ featuring Kate Moss, they appeared in Vogue in 1993 and caused uproar at the time. The reason we were looking at this image and comparing with Van Gogh was that the light sources are probably the same.
 
Having looked at both images we then tried to replicate the type of light used in both the images using studio flash heads. The lights were set up, our cameras were set in accordance to the lighting and the situation we were confronted with and we all took a number of pictures of each other exploring this type of light.


Feelings

 At the moment with five lesson already gone and the deadline still some months away I feel okay about the current situation. The camera is complicated with so many settings and I feel that it would be a challenge to shoot either at home or in the studio still. This lesson though felt useful as did the lesson last week, I now think I understand what ‘Point light’ and ‘Diffuse light’ are. I think now when I look at pictures I can start to recognise the light and talk about the characteristics of the two types.

I was confused a little with the PDP (Gibbs Reflective Practice) but since the last lesson and the guidance to use it to generate the written responses to the lesson as I am here, I think I’ve now completely got it.. So for the moment with so many weeks ahead I feel that if I keep on top of the work I’m going to be okay.

Evaluation

 At the moment the good stuff out-ways the bad stuff, the lessons are all coming together nicely and I feel like I’m learning at a rate that I can keep up with. This lesson in particular was really useful and has made me realise a few things about the light in my flat where I am going to do my location shoot. I also think now if I look at photographs and paintings I’m going to be able to analyse the light at least in terms of where its coming from and whether it is point or diffuse light.

 Bad stuff, is primarily down to me being lazy. The work from the last three weeks wasn’t written up like this and I’ve still yet to use my camera outside of college and I really do need to try it out at my flat. I’ve not been printing off the images from the lesson and these images here are the first to have gone in my book, so I need to catch up.

Analysis

Initially we looked at the Van Gogh image. The observations that were made and discussed were as follows.  Apparently It was common around this period and continues to be so, that the light that painters use/d was ‘North Light’. This is the light that faces the north side of a building/studio. The reason is that ‘North Light’ is reflected off the blue of the sky or cloud and therefore is no-where near as variable as direct sunlight seen in the south. Light coming from the south varies massively in colour and quality. We saw this in the lesson last week when we were taking pictures in the atrium. The light changed from one minute to the next. Point light when the sun was out had harsh shadows and diffuse light when the clouds covered the sun had soft shadows. North light is far more consistent – generally, flat, even, diffuse and soft; wrapping around the subject and sought after by painters such as Van Gogh.

 It was also noted that the image was predominantly blue, the skin especially and again this is one of the properties of North light, the colour is a cold blue as opposed to the variable light from the south. We all recognised that south light when it rises in the morning is warm and golden as it is in the evening.


 Looking at the Van Gogh image we all suspect that his studio must have had a large window facing the north and the lecturer drew up a lighting diagram for the Van Gogh image…

(A) Represents a window through which the light is passing. As the light passes through the window it scatters more and produces a soft, diffuse, wrap-around light.
(B) Is the viewpoint from which the subject (C) is viewed. Because of the separation between the subject (C) and the wall (E) the shadow (D) falls diagonally for the most part out of view and is only rendered on the subjects face.

The subject in the image is sat at 3/4's to the light in order that the majority of the face is lit and the shadow falls onto only a small proportion of the face nearest the wall giving us some sense of the contours and shape of the face.


Corinne Day ‘Under-exposed’ shoot lighting

The image of Kate Moss shot by Day looks to have used exactly the same kind of light albeit from the opposite side. The other difference is whereas Van Gogh is depicted separated from the wall leaving no shadow on the wall Kate Moss is leaning on the wall almost casting a shadow on the wall. It’s the quality of this shadow that enables us to hazard a good guess as to the light source along with a little research. From a little bit of research it’s easy to find out that this was shot in a flat using daylight…


"The setting - the West London flat she shared with the photographer and model Mario Sorrenti".

"Been photographed in daylight by her closest friend, the model-turned-photographer Corinne Day".


 The lighting diagram that we came up for this is…


(A) Again North Light coming through a large window, again scattering and diffusing as it does so.
(B) Indicates the general direction of that diffuse light towards the model (Kate Moss).
(C) Would be the position of the camera - the body position of Kate Moss is straight on and the lack of distortion would indicate a lens of 50mm or more?
(D) Indicates the field of view, the composition is quite tight with furniture in the bottom left hand corner and Moss's arm breaking the edge of the frame.
(E) Is the model position against the wall and the shadow cast by her body is indicated by the hatched area (F).
 
If we analyse the use of the light further in the image we have to consider what Day was trying to do in these images. Reading the Robin Muir article it’s apparent that there’s a fusion of a ‘Documentary’ approach in these images and sense of reality. The images are done in a way that looks very basic, we’re led to believe that this is a flat and that the light is what it is, so it is in fact wholly appropriate. Furthermore Day uses the light in a way that is flattering. The light is soft and diffuse, but coming from such an angle that there is some ‘Modelling’, we can see the shape of Moss’s face and figure, the clothes (Top) has obvious contours in it, so the lighting has been used cleverly.

Creating the Corinne Day lighting in the studio


 We then had to recreate the North Light effect seen in both the Van Gogh painting and the Corrine Day photograph in the studio. One of the lesson earlier on in the term Dave spoke about the fact that the further the light travelled the more even and manageable it becomes. We found a blank white wall for our Model (Dave) and placed the lights pointing away from him, bouncing off of the opposite wall and corner. The heads were positioned quite high so that the impression was that the light was coming from a slightly higher position.


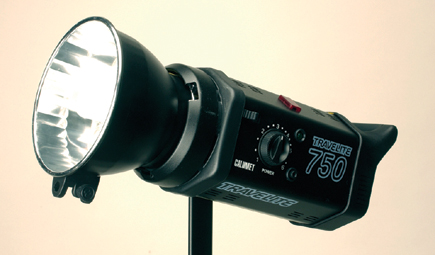
(A). Two Bowens Esprite flash heads turned up full power and pointed into the same area on the opposite wall of the studio to the model. Initially a point light source, but once bounced off the wall (B) becomes a larger diffuse light source, with properties like that of light coming through a window.


(C). The resulting lights direction aimed at the model.
(D). The camera set with a focal length of 55mm or longer pointed directly at the subject.
(E). The model positioned against the wall.
(F). The shadow.
(G). This is a 8’x4’ white poly board. This was positioned next to the subject just out of shot to reflect light back into the subject ‘Filling in’ the shadow. When the board was really close the shadow was virtually invisible and the further it was away the more obvious the shadow was.
 
In this image (Above) the reflector is placed a good distance from the subject and therefore doesn’t affect the shadow. We deemed this okay, but wanted to look at the effect of bringing the 8x4 board a lot closer…
The ‘Fill’ from the reflector in this image almost completely negates the shadow and could be deemed as too flat. But a compromise between the two may give us the desired effect?

Camera Settings

The camera settings for the studio were as follows…
1.    Manual Mode
2.   ISO 100 (Lots of lighting means that a low iso is easily used and that retains quality. The faster the iso the lesser the quality of the images.
3.   File settings – Raw + Fine JPEG or if you haven’t got access to Raw software use Fine JPEG
4.   Lens set to 55mm or longer, too close will mean the image will start to distort.
5.   Shutter Speed – 1/125 – again this is easily achievable in the studio due to the control we have over the light.
6.   Aperture – This is the variable aspect with regards the light in the studio. We had to use 2 lights to get the light reading at 100 iso up to F11. The lenses work best at around F8/F11 so this was perfect in this scenario.

Conclusion


What else could I have done? The only other thing I could do is ask my class mates to be more involved and shoot more of them? Maybe we should come in with it in mind that we’re going to be photographed and offer ourselves as models rather than keep photographing our teacher? Other than that I think this write up has gone really well and I’ve written a ton of stuff that meets most of the criteria that we’re meant to meet.

My only concern at this stage is that if we approach our work in this way it becomes the PDP which we have to hand in during November and yet we carry on till January?
 I’ve talked to Dave and he has said that if we produce the work like this he’ll photocopy the pages that are done in this way and have them as the PDP.
Action Plan
 This has gone really well, but I readily acknowledge that the work that I’m supposed to be producing independently isn’t coming together and I need to start getting things together as time will catch up on me. We have been clearly told that we should try our ideas out in the most basic way in order that we have images to put in our book and respond to with more independence. This will also enable Dave to look at the work and give us feedback and guidance and maybe adapt the lesson to accommodate our own specific ideas with direct examples.
 So, this week I’m going to…
1.    Ask my mate Jo to model for me for my first test shoot on location (My flat).
2.   Plan the shoot for Saturday with Jo and ask a 2nd person to be a back-up model, maybe one of the group as they can act as an assistant as Dave has suggested. That way, if I can’t figure something out, between us using our notes we might be able to come up with a solution?
3.   Between now and Saturday I’m going to try and take pictures and set my camera up using my notes to get some confidence.
4.   I’ll make notes of my camera settings and record them in the event that it goes wrong.
5.   Whatever images come out, I’m going to get them printed and make sure they are in my book so that Dave can have a look and offer advice if need be.
6.   Then I’ll Gibbs it all again.


Wednesday, 1 October 2014

Research Resource - prompts and questions

Research Resource - prompts and questions

www.listofphotographers.blogspot.com

I adapt these and develop these types of resources on a regular basis trying to find an easy one that fits all uses. This one is designed to be used in conjunction with examining and using written materials as well as the accompanying images.


Use this prompt sheet to generate questions and answers relating to your research.

Remember; in order to make your responses analytical you will need to ask what if type questions.

A personal approach – what do I bring?  Yourself – your world – your experience. Use this approach first.

(1).Yourself – What are your first reactions to the work? Why does it make you think or feel like that? There are fundamental differences between us that condition the way we see things. Gender, race, class and age will all determine the way we look at and understand art, as will our attitudes, values and beliefs. What’s your take on this type of work before you commence your research?

Looking at the object – what can I see? – Colour – shapes – marks – surface – scale – space – materials – processes – composition

(2).Colour – What colours does the Photographer use? Why do you think s/he used these colours? How are they organised? What effects do they create? Do they draw your attention to them for a reason? Would it work better in B&W and vice versa? How is the colour used – Colour harmony, discord, contrast, monochromatically?

(3). Production values – size, format, scale, materials – how well has the work been produced, what camera has been used? Can you see that this is a high quality product destined for a certain market/use?

(4).Composition – How is the work organised and put together? How is the rule of thirds used? Is it presented in portrait or landscape format – why?

(5). Lighting & Mood – How is the light used, is it high-key or Low-key? What kind of lighting is being used; is it point or diffuse? High contrast or flat? Is the lighting ambient or mixed? Are there any clues as to how the lighting is being used and why? How is shape, form and texture affected by the use of the light – how relevant is this aspect?

(6).Location/Background/Scene – look at the scene and the background, do the details in the foreground and the background relate to each other, is the narrative of the image reinforced by this relationship? Is it constructed – how do you know? Would the narrative change if the viewpoint was changed – how/why?

(7).People images – Look at the body language, the clothes, facial expressions – how can these be read and deconstructed?

Looking at the subject – what is it about? Content – message – title – theme – type/genre

(8). Message – What does the work represent? Moving beyond a straight description of what you see, try to speculate on what the work might stand for. Are there symbols or conventions you recognise?

(9). Purpose – Do the images have an instantly recognisable purpose – what could they be used for, how and why? Who is the target market and why?

(10). Influence – Is the work influenced by the work of other photographers or artists?

Context – When – where – who – history – other arts – other fields of knowledge – the present – the hang – interpretation – the environment

(11). When – When was the work made? Can we make any connections between the work and the period that it was made?

(12). Who – Who made it? What do we know about the artist? Who was it made for?

(13). The present – How do people view the work today? Is it the same or different from how it might have been seen by different generations/eras?


What are the most effective forms of secondary research and why?

Journals – Such as British Journal of Photography, Aperture, Image, 8, AG and Hotshoe (All found in the library and LRC).  You need to be very selective with your research. The most effective way is to use the journals listed above. If you look at, read and use these on a regular basis it will introduce you to a vast array of types of photography and so inspire and influence your projects throughout the course.

The articles in these magazines are short and concise, ram-packed with the type of information you’ll need to use in your analysis of research.  The articles give you the information and you’ll learn the vocabulary required to do well on your course.

In addition video’s where the artist talks about their work or is interviewed. www.americansuburbx.com

Read the article – Now start to make sense of the images with the knowledge from the article and any further research – have a look to see if there is a Ted talk, or a Youtube interview with the artist. Make sure the information can be trusted.

Don’t use Wikipedia or blogs written by people without any qualification to comment on the work. Only use national newspapers (Be wary of some though). National and regional museums and galleries, check the credentials of the interviewers and writers using their Linkedin profiles or similar, are they qualified to comment on the work? If in doubt don’t use them. The safest way is to use the BJP and other edited journals.


Friday, 31 January 2014

Poly-board Tunnel - Fashion Portraits - Diffuse Light

http://www.listofphotographers.blogspot.co.uk/

This is another light set-up that we cover, that produces an exceptionally soft diffuse wrap-around light. It requires a fairly large studio space because you need to make a large box shape construction out of your 8'x4' poly-boards. You'll need the following equipment...

2 x studio flash heads and appropriate light stands.
6 x Poly-boards 8'x4'.
A table (typical school table).
Optional backgrounds.
2 x small light stands.

Place the table in the middle of the studio space with an appropriate (white) background behind where the subject/model is stood (A). Construct the square shaped tunnel on top of the table (See second diagram). The sides need to be supported by small extended light stands either side of the poly-boards as you construct it, you should also work with an assistant to make the whole thing easier and safer. Once the side are in place the top of the box should be carefully placed making a tunnel.

Starting with one light, either (E) or (D) set the light up so that it's just outside of the box positioned so that it's directing the light into the box at 45 degrees. Have the light so that it's positioned mid-way up the box, with the light angled into the box straight rather than downwards or upwards. The lights must not be visible to the model when standing at (A). You take your light reading from the face of the model pointing the invercone into the tunnel measuring the light falling onto the face of the model. Dependent on what you're aiming to achieve (Shallow depth of field or deep) make a choice with regards to your aperture. We would generally go for f8 for each flash head. They're measured individually and accurately (work to eliminate the 10ths of stops). Once they're both set to f8, the combined reading of both of them being fired at the same time will produce a reading of f11. At which point if your camera is set up correctly you're good to go!
 
This below is an approximation of a 3D view.
If you've not set the lights up with the poly-boards at (c) you'll probably experience bright panels of light either side of the subject in your images. The light travelling down the tunnels will be absorbed  to some extent giving you an image in accordance with your meter reading, but the light that passes down the outside of the tunnel is not hindered and may be recorded in the image either side of your model slightly brighter. In which case you need to prevent that light from falling on your background.
 
The effect is that a white background as with our infinity cover will be rendered slightly U/Exp. The further the box is from the cover the darker it will be.
 
3 Light system - pure white back-ground.
 
We then developed the set-up, by introducing a 3rd light (below) indicated by (j) in this instance we just used a dish-less head. The light was positioned so that the light fell onto the white B/G, but you have to be careful to ensure none of the light encroaches onto the model/subject to ensure the hatched area (b) is still maintained at around f11. The third light (g) is calibrated so that it gives a reading of around f16 (1 stop brighter). This modification of the lighting will produce a pure white background.
 
This method was demonstrated originally by commercial photographer Struan Wallace.  


Monday, 9 December 2013

List of Photographers and their themes

Whoa! The list has gone!!!

No it hasn't, it's just been updated and improved just click the link below...

http://www.listofphotographers.blogspot.co.uk/

If you've been re-directed here via a link in your assignment click on the link above. Once you're there use

CTRL + F to find the name of the photographer you were interested in. Once you've found the photographer, there should be another link to a high quality resource for your research.

Monday, 18 November 2013

Studio Stuff - Basics

Studio basics (For inspiration & ideas check out http://listofphotographers.blogspot.co.uk/ )

Here's some guidance regarding using the studio.

Equipment - The list here is broken up into 2 sections the first part is a minimal approach and the second section is my recommended full list and the third section is for 'Hardcore' serious students that are seriously interested in learning Studio lighting techniques.

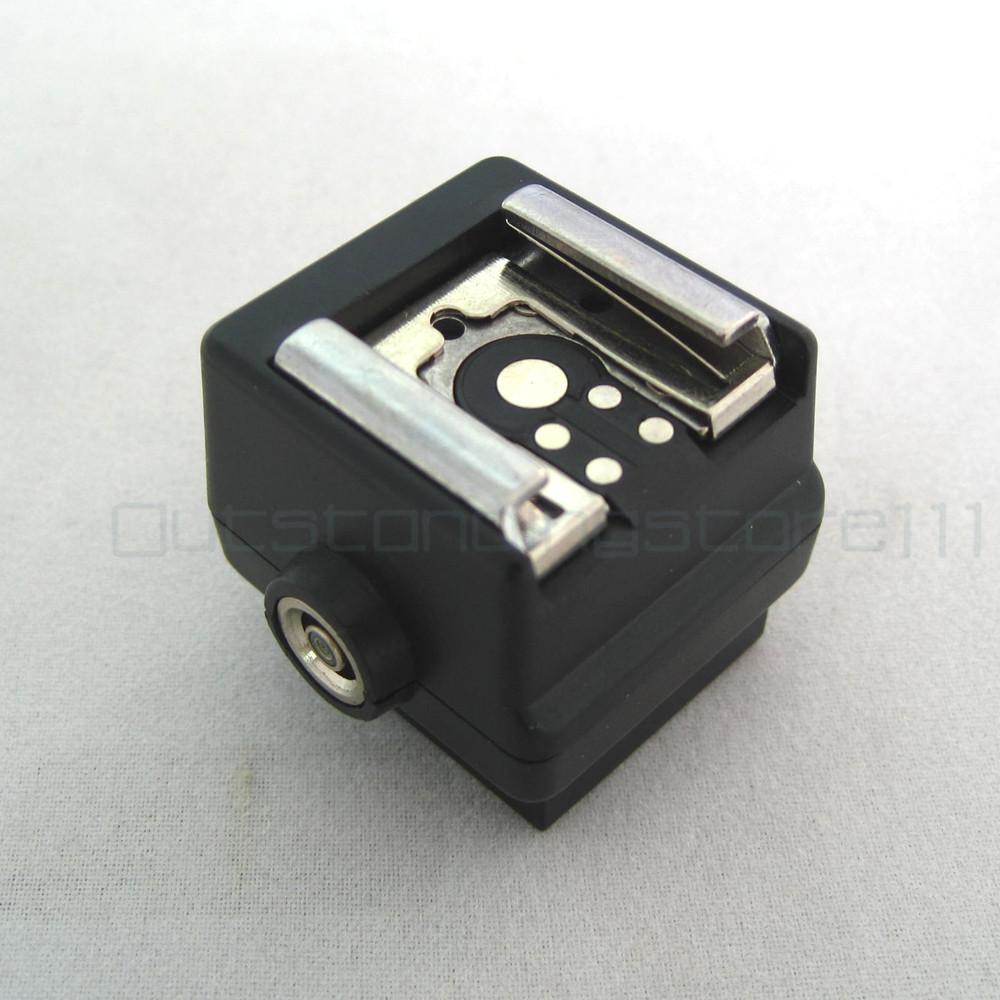
  • Hot shoe adapter
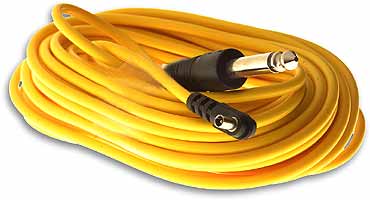
  • Sync lead x 2
  • Sekonic L308 light meter
  • Tripod adapter
  • Tripod
  • Camera
  • Lens with focal length of 55mm or longer


  • Tool box - Pliers, wire, screws, blue tac, string, fishing wire, a range of tapes, long nose pliers, nails, bulldog clips, crocodile clips, pegs, drawing pins,

Work in Progress Sekonic L308 flash/light meter.


 Basic set up in the studio.
 
You need to set your camera up ready so that it's configured for studio use...
 
Set your camera to Manual
Set your ISO to 100
Set your white balance to Flash
Use a focal length between 55mm - 70mm (DSLR)
Set your shutter speed to 1/125 (DSLR)
Consider using Manual focus
 
Now configure the Flash Meter for use in the studio...
 
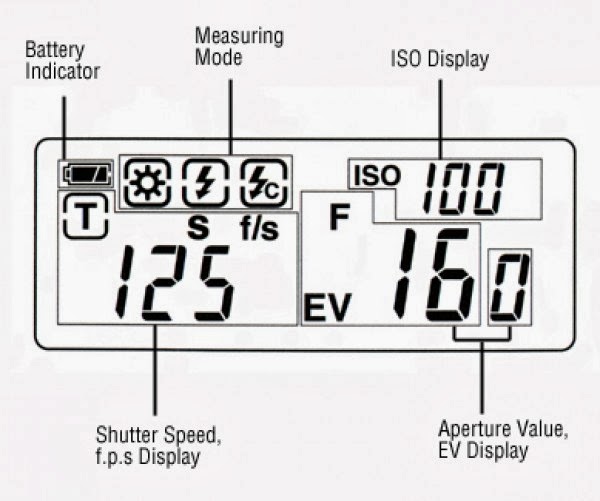
1. Set the Invacone so that it is in the position as in the image above (e.g. covering the sensor). The invacone is the white dome on the front of the flash meter.
 
Starting at the top of the meter - press the power button and the LCD display will come on.
 
2. "Mode" By pressing the mode button you will see the that the 3 symbols next to the battery power symbol (Top left of the display) are highlighted by a box appearing around them when they are selected. Select the 'Flash Cord' mode e.g the one with the flash symbol and the letter C.
 
 3. "ISO" On the front of the meter is the ISO button, press this and hold it down whilst pressing the 'Up' and 'Down' arrows on the side of the meter. You'll see that the number next to the word ISO on the front right hand side of the display changes, this will need to be set so that it corresponds with your cameras ISO e.g. 100.
 
4. "Shutter Speed"; Using only the Up and Down buttons on the side of the meter watch the number next to the T symbol on the left hand side of the display. Adjust these numbers so that they are set to the same shutter speed as your camera e.g in this instance 125.
 
The meter is now calibrated and ready to go in conjunction with your camera being set up per the instructions above.
 
Once you've done this, arrange your lights in the manner you desire. Then using the flash meter, make an 'Incident' light-reading. (With white dome in place).
 
Plug the synch lead into the hotshoe adapter and the flash unit/head...
 
The Measurement of the light


The basic principle is - you measure the light that is falling onto the subject. This is the "primary" light source, you may introduce additional lights at different stages and the light readings will become more complex. So, in the first instance use one light and take a reading for that scenario.

Hold the light meter close to a key element of the subject. In the example above, it's a portrait, so the light reading is primarily for the face. Therefore hold the light meter almost touching the face (if not actually touching the face) and press the trigger button on the side of the meter at the top. This will trigger the flash and the light meter will register a light reading in the LCD panel next to the F (Largest number in the display). This will be the light reading measured in aperture values F2, F2.8, F4, F5.6, F8, F16 etc.

At this point you make a decision as to what aperture you want to use. Do you want limited minimal depth of field or maximum depth of field? Normally with a portrait, you want as much of the person in focus, so you would normally opt for an aperture of F8 or F11. These are also normally selected because your lens works best at these settings.

Get your assistant now to make the adjustments to the power output of the flash head, whilst you make the light readings.
 
 Using the dials on the side of the flash unit, your assistant makes adjustments either increasing or decreasing the power output. Each time they make an adjustment...
 
"Increase the power by 1 stop" They should dump the charge manually via the discharge button on the flash head before you make the next measurement. You make these adjustments until you get the required light output that you're after say for instance F11 (Which will be displayed as the F number on the LCD panel on the flash meter).
 
Warning - You have to ensure the reading is correct, the F number is recorded in whole values e.g f 8 and 1/10th values e.g. f 83. It is important that you are aware of these tenth values and that you adjust the lights accordingly and you're advised to work with whole values when you're learning the basics.
 
Don't stand in front of the light when you're measuring the light.
 
Once you adjusted the lights and they're giving you your reading of F8 and you've checked it, the model will have to stay in that light zone, if they move closer or further away the light reading will change because of Inverse Square Law. Keep control of your models make sure they stay on the same plane of focus, make a mark on the floor and ensure they stay in that zone. If they have to move around you will have to adjust the lights again.
 
Now set your camera to F8 and away you go!


Sunday, 10 November 2013

How do I use research?

Good research is essential for your A-Level/Level 3 work as it incorporates many of the elements that you're assessed against...

Your ability to record relevant data/information
  "                "    summarise information
  "                "    synthesise information
  "                "   make observations relevant to your intentions

It's also a skill you'll need to take forwards into employment and university, so, if you can come to grips with it now and develop the basic skills at this level it'll set you up for the future. The university point is especially relevant because when you go for your interview at Uni with your portfolio, they'll be looking at your work to see if you've engaged with this aspect of the course. Your research will be reflected in the kind of final outcomes you produce, so if you've accessed diverse and good quality research material and your work is obviously inspired by a range of different approaches and not simply Flickr, it will demonstrate a deeper understanding of what photography is and its potential. It'll allow the interview panel to ask questions such as 'Who is this work inspired by'? And you'll be able to come up with a coherent answer that'll show them your time on your A-Level was spent studying.

Using research...

The most obvious way of using research is by direct association with the theme. Again using the idea your project is about dogs as an example, you should search through journals and books constantly always keeping an eye out for images or articles on dogs for possible use in conjunction with your work. If that's not an option or you've done that and drawn a blank, you might then search my list of photographers and found a few photographers that use dogs as a theme within their work. That's a direct approach and for the most part that should give you enough info to work with, but there is another way that might be useful, especially if you're photographing a theme that is obscure.

Indirect association research...

Keeping with the dog theme... you might have found some direct research either from my list or better still from a journal that you've decided to use. But, because you were using journals you also accessed so much more photography by the process or perusing the magazines and journals and in between looking for the dogs a number of other photographers caught your eye simply because of the way their images looked. For instance you may have seen the work of Don McCullin...
 
 Whilst this has nothing to do with the dogs project directly, it still may be worthy of a place amongst your research. You may have stopped at this image in the magazine simply because of the starkness and the mood evoked by a number of visual language elements within the image? Having looked at some of the specific dog research material, you may have got lots of ideas and were able to analyse the work of the photographers. But, you can do the same with indirect subject matter such as McCullins image here...
 
"Looking through the BJP's for dog photographers, I came across the work of Don McCullin. Whilst it doesn't feature dogs, I love the way that he produces these images and the stark effect he produces in his prints and it might be something I could consider incorporating into my own dog images? My dog project to some extent might explore the more menacing aspects of dog ownership and the relationships people have with their dogs and therefore this approach here that McCullin uses might offer a way in which I can evoke more negative connotations through the use of visual language".
 
As a student you could then (as advised) produce a high quality image of McCullins and then go through the process of deconstructing it and analysing it using the prompts on the Visual Language Analysis page add a few more smaller images to support your observations relevant to your intentions. Have a look at the interviews on Youtube, listen to what he says about his photography, look at the transcriptions of any interviews that are published on the internet (Search Google using "Don McCullin + Interview"), he's virtually guaranteed to say something about why he takes pictures that has some resonance with what you're doing - use some of this as quotes within your research ensuring you record the source in your bibliography.
 
Then towards the end, when you've identified that you've established as much info as you need to on McCullin, bring it back to your dogs (Or your theme) and reiterate the connection and how you're going to use aspects of McCullins practice in conjunction with your own work.
 
Other aspects that might drive your work forwards towards that A-Grade is the fact that through your research you might identify that for the most part his work is recognised for his war photography. You might discover that he uses a particular type of film... That then might lead you to conclude...
 
"Having looked at McCullins work in more depth, I understand that it's all shot on 35mm cameras much like the Pentax K1000's we use here at college. I've been inspired by this work and it's made me want to try and shoot my project in this way using film. Having spoken to our lecturers they say one of the most popular choices of film for this kind of approach is Kodak Tri-X Pan, so I'm going to try that out and see if I can get this affect..."
 
Which means your research (As intended) now gets you to start experimenting with new and exciting approaches to producing images - picking up on increasing amounts of learning outcomes as you go!