Showing posts with label students. Show all posts

Saturday, 5 March 2016

Putting together your practical work

Old and out of date. 
New for 2020 - https://www.youtube.com/watch?v=9JK4VfqXBzY&t=975s

What do you write and what do you include when putting together a response to your practical work?

Here's a suggestion as to how you might go about it, needless to say adapt to your own methods if you don't like all of it, but if you're completely lost as to what to do and write, this may offer a solution. One of the key points of this approach is the use of a display folder, as it means at any point you can edit and remove pages to improve the folder in any way.

This method is ideal for your work at the developmental stages - test shoots, trials and experiments. Remember your work must be developed over a series of stages as your work out what you're going to do for the final product.
The Blue section should be your 'Planning' what you intend to do, your resources, where, when and who? Needless to say the more details the more indicates your levels of planning and organisation. The Red section is also 'Planning' but more visual - a lighting plan, showing where the light sare and included a key to explain what the components are. Generally most photography courses want 'Visuals' diagrams and sketches and if you can include these that'll be great.
The Green section is examples of images from the shoot, you can use contact sheets/thumbnails, but I've made mine slightly bigger and selected some of the images that were typical from the start of the shoot rather than all of the images, showing that I was working with poses. The text in this section deals with the colour of the background and the poses and the decisions I was making as the shoot progressed. Keep the details simple at this stage, just write about what you were trying to achieve or was expecting to happen.

Page 2 (below).
Top left - more images from the shoot either selected ones or the whole contact sheet, it's up to you, showing how the shoot comes together and ideas are developed. Right-hand side ringed in Green images of how you've set up the lights. Always step back and shoot images of your light set ups either with the camera you're using or a phone or whatever is at hand. This gives you the opportunity to add details about the equipment and is good for future reference if you use the lighting again and want to replicate the lighting.

Ringed in Blue is the image that influenced the shoot with the lighting we're trying to replicate. In this instance I've not done a lot of research into the image, but potentially you could find out who shot it and do some research into the photographer and possibly add additional images from the same series. I've written about the light and the exposure, but more could be added relating to the fact that it's high-key and the composition and a lot more (See prompts in side bar).

Page 3
This section is potentially the part where you're going to pick up loads of credits that meet the criteria. The way we advise you to do this is to structure the response to your own work using he Gibbs Reflective Practice Model which works with either 5 or 6 prompts (I've missed out no.5 "Conclusion" in this instance). Reflecting on your work making sense of it, criticising it with the intention of identifying areas of strength and weakness is an essential aspect of your work. Making sense of it and analysing it is essential too and Gibbs steers you through the process in an orderly manner and is a dream for your lecturers/assessors to mark!

Most of the sections can be relatively short and concise, the parts you do want to focus on and produce more written material around are the analysis and  planning sections. The planning part leads you into the next round of work.

Page 4
On this page, I've chosen what I felt was one of the better shots and I've taken the time to reproduce it at A3 set in a white surround. You could if you wished have it printed as a full bleed image covering the whole page. The choice is yours.
I would advise as when you produce these final shots you do so at the best quality you can stretch to and keep the approach that you use consistent.

* Note (For my students for 5135 - Fashion promo and WN25) if you do this as you go along and you engage with the process fully you should end up with a pretty useful folio of images as we'll be using some really top quality lighting techniques. The images will be massively improved if in each session your models are styled appropriately. I had to rush this example so wasn't able to get hold of a blonde model and make the images as high-key as the Kate Mosss Vogue cover.

Don't like my approach? Have a look at these here - some of the best from all around the world.


Monday, 8 February 2016

The Prompts - Responding to and writing about images "Light".

This is an important one to always include as it demonstrates your knowledge of how light is used. For this you need to look at the light and judge whether the photographer has used available light, studio flash, flash guns, daylight or a mixture of any of these or something different? You should then write about the quality of the light in terms of it being ‘diffuse’ or ‘Point’ light, discussing the impact this has on the image – shadows, contrast, definition, flattening, vibrancy of the colour. Does the light set the mood in the image; does it make the image look dark, sinister, bright or happy? Think about and discuss the light in terms of other aspects of photography you’ve previously learned about – does it look like another practitioners (Photographers) lighting style, does it help with making image look objective or subjective, is the light full of drama or is it neutral?

Say why you think the photographer has made these choices – how relevant is the light to the image overall - is it inconsequential or fundamental? Could the light be used differently – is the light consistent or inconsistent across a series of images – think about the Becher’s for instance all of their images had a uniformity by virtue of only ever making their images when the light was of one specific type/quality.

With interior shots featuring people or objects, look at where the light is falling, look at reflections in the eyes and other reflective surfaces or objects – look for clues as to what kind of light has been used? Is it simple or is it complex?

You might even include lighting diagrams?

Tuesday, 28 January 2014

Studio Lighting - white floor - full length fashion portrait.

http://www.listofphotographers.blogspot.co.uk/

Studio lighting - white floor on a full length fashion portrait.

One of the conundrums of studio lighting is how to achieve a white floor, or at least reduce the amount of re-touching required in Photoshop.

In one of the lessons, we use a single light method to test this theoretical approach out (Below).


The floor plan is drawn on the white board and the students copy this up. I usually get a couple of the least experienced student to then set up the lights and take the meter readings, one acts as the assistant and the other the photographer. The rest of the class look on as H&S monitors.
 
I then go round the class asking individual students how they need to configure their cameras...
 
Manual Mode
White balance set to flash
Lens set to a focal length of 55mm with a DSLR
Focusing point set for upright portrait, central or manual focus.
Shutter speed - 1/125
ISO - 100
 
We them aim to set the lights to give us a light reading of approx. F8 or F11.
 
The light (B) is the primary light source and we use either a medium size dish (Parabolic type) or a white umbrella with the light reflected out of it. The best option if available is small soft box approx. 18" x 18". The light is set at 45 degrees to the subject and the meter reading is taken from the face. The light gives good modelling to the face picking up the shape and features. Some attention should be given to where the shadows fall and reflector (D) positioned to provide fill-in.
 
The main observations with this demo is to look at how the floor is rendered. Students tend to have their lighting far too close to the subject and therefore have poor results due to the negative affect of Inverse Square Law. The basic principal that needs to be taught here is The further the lights are away from the subject, the more control you'll have over the lighting. (Inverse Square Law). The downside of this is that your studio needs to be relatively large in size in order to give you the distance from the subject (height and length).
 
In our studio in this demo we use the height of the studio to gain our necessary distance from the subject so putting Inverse Square Law into practice in our favour. With the light fully extended to the ceiling (15') the light striking the model is sufficiently even as to cover both the model and the surrounding floor space. The distance between the model and the infinity cover behind is approx. 15'-18' and with this single light is almost rendered 100% white too!
 
The only issue and area for concern is the shadow between the subject and the reflector board, but this is relatively small and unobtrusive and easily removed in Photoshop. Or you can explore the use of using the reflector closer or adding more lights? A mate of mine who uses this in a professional context places an additional reflector between the model and the camera directing additional light back into the floor reducing the shadow further still. Students should be encouraged in their own time to explore this as an option.
 
If you need to link this with a practitioner you should use my http://www.listofphotographers.blogspot.co.uk/ and type in studio and check out the photographers there.
 
Note, as a student you should record exactly what you do when setting these lighting sets up and take a wide shot of the set, to use alongside your floor plan and the resulting images.
 
Once completed you should then reflect on your activities.
 

The Gibbs reflective practice process should not be seen as a separate entity from your work – an ‘Add on’. It should be seen as an integral part of how you put your projects together… Each time you produce something of substance or try something new or challenging, it should be followed by the ‘Gibbs’ process.


Monday, 18 November 2013

Studio Stuff - Basics

Studio basics (For inspiration & ideas check out http://listofphotographers.blogspot.co.uk/ )

Here's some guidance regarding using the studio.

Equipment - The list here is broken up into 2 sections the first part is a minimal approach and the second section is my recommended full list and the third section is for 'Hardcore' serious students that are seriously interested in learning Studio lighting techniques.

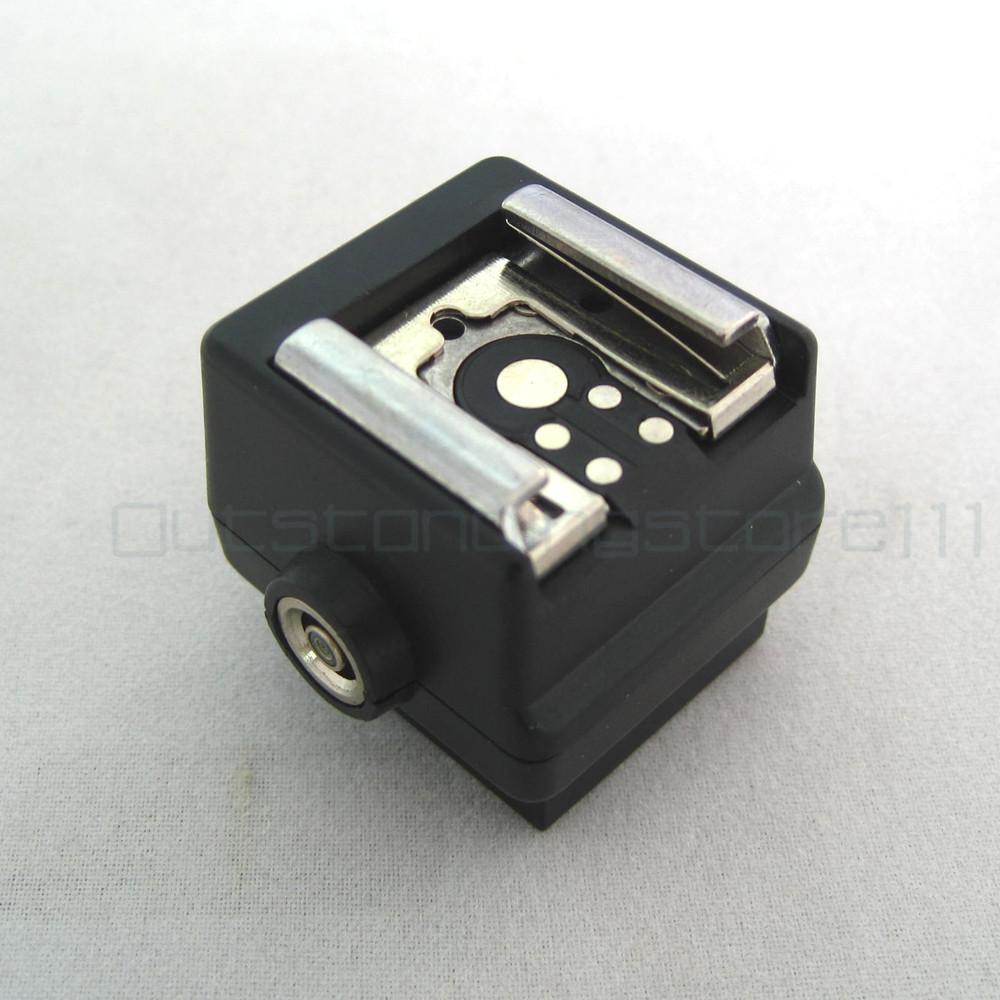
  • Hot shoe adapter
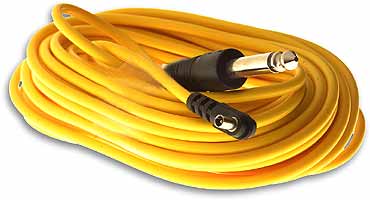
  • Sync lead x 2
  • Sekonic L308 light meter
  • Tripod adapter
  • Tripod
  • Camera
  • Lens with focal length of 55mm or longer


  • Tool box - Pliers, wire, screws, blue tac, string, fishing wire, a range of tapes, long nose pliers, nails, bulldog clips, crocodile clips, pegs, drawing pins,

Work in Progress Sekonic L308 flash/light meter.


 Basic set up in the studio.
 
You need to set your camera up ready so that it's configured for studio use...
 
Set your camera to Manual
Set your ISO to 100
Set your white balance to Flash
Use a focal length between 55mm - 70mm (DSLR)
Set your shutter speed to 1/125 (DSLR)
Consider using Manual focus
 
Now configure the Flash Meter for use in the studio...
 
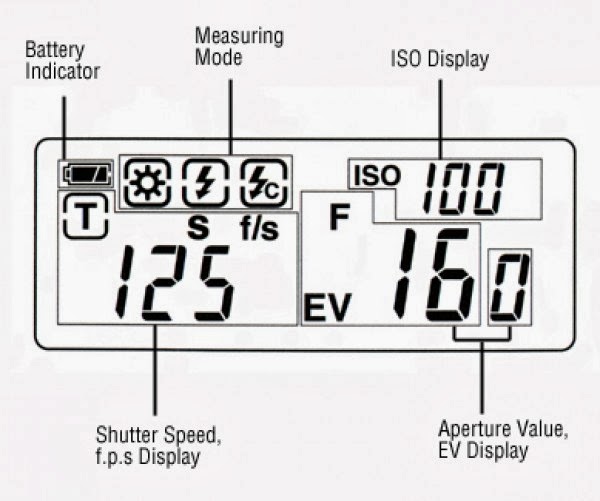
1. Set the Invacone so that it is in the position as in the image above (e.g. covering the sensor). The invacone is the white dome on the front of the flash meter.
 
Starting at the top of the meter - press the power button and the LCD display will come on.
 
2. "Mode" By pressing the mode button you will see the that the 3 symbols next to the battery power symbol (Top left of the display) are highlighted by a box appearing around them when they are selected. Select the 'Flash Cord' mode e.g the one with the flash symbol and the letter C.
 
 3. "ISO" On the front of the meter is the ISO button, press this and hold it down whilst pressing the 'Up' and 'Down' arrows on the side of the meter. You'll see that the number next to the word ISO on the front right hand side of the display changes, this will need to be set so that it corresponds with your cameras ISO e.g. 100.
 
4. "Shutter Speed"; Using only the Up and Down buttons on the side of the meter watch the number next to the T symbol on the left hand side of the display. Adjust these numbers so that they are set to the same shutter speed as your camera e.g in this instance 125.
 
The meter is now calibrated and ready to go in conjunction with your camera being set up per the instructions above.
 
Once you've done this, arrange your lights in the manner you desire. Then using the flash meter, make an 'Incident' light-reading. (With white dome in place).
 
Plug the synch lead into the hotshoe adapter and the flash unit/head...
 
The Measurement of the light


The basic principle is - you measure the light that is falling onto the subject. This is the "primary" light source, you may introduce additional lights at different stages and the light readings will become more complex. So, in the first instance use one light and take a reading for that scenario.

Hold the light meter close to a key element of the subject. In the example above, it's a portrait, so the light reading is primarily for the face. Therefore hold the light meter almost touching the face (if not actually touching the face) and press the trigger button on the side of the meter at the top. This will trigger the flash and the light meter will register a light reading in the LCD panel next to the F (Largest number in the display). This will be the light reading measured in aperture values F2, F2.8, F4, F5.6, F8, F16 etc.

At this point you make a decision as to what aperture you want to use. Do you want limited minimal depth of field or maximum depth of field? Normally with a portrait, you want as much of the person in focus, so you would normally opt for an aperture of F8 or F11. These are also normally selected because your lens works best at these settings.

Get your assistant now to make the adjustments to the power output of the flash head, whilst you make the light readings.
 
 Using the dials on the side of the flash unit, your assistant makes adjustments either increasing or decreasing the power output. Each time they make an adjustment...
 
"Increase the power by 1 stop" They should dump the charge manually via the discharge button on the flash head before you make the next measurement. You make these adjustments until you get the required light output that you're after say for instance F11 (Which will be displayed as the F number on the LCD panel on the flash meter).
 
Warning - You have to ensure the reading is correct, the F number is recorded in whole values e.g f 8 and 1/10th values e.g. f 83. It is important that you are aware of these tenth values and that you adjust the lights accordingly and you're advised to work with whole values when you're learning the basics.
 
Don't stand in front of the light when you're measuring the light.
 
Once you adjusted the lights and they're giving you your reading of F8 and you've checked it, the model will have to stay in that light zone, if they move closer or further away the light reading will change because of Inverse Square Law. Keep control of your models make sure they stay on the same plane of focus, make a mark on the floor and ensure they stay in that zone. If they have to move around you will have to adjust the lights again.
 
Now set your camera to F8 and away you go!


Sunday, 10 November 2013

How do I use research?

Good research is essential for your A-Level/Level 3 work as it incorporates many of the elements that you're assessed against...

Your ability to record relevant data/information
  "                "    summarise information
  "                "    synthesise information
  "                "   make observations relevant to your intentions

It's also a skill you'll need to take forwards into employment and university, so, if you can come to grips with it now and develop the basic skills at this level it'll set you up for the future. The university point is especially relevant because when you go for your interview at Uni with your portfolio, they'll be looking at your work to see if you've engaged with this aspect of the course. Your research will be reflected in the kind of final outcomes you produce, so if you've accessed diverse and good quality research material and your work is obviously inspired by a range of different approaches and not simply Flickr, it will demonstrate a deeper understanding of what photography is and its potential. It'll allow the interview panel to ask questions such as 'Who is this work inspired by'? And you'll be able to come up with a coherent answer that'll show them your time on your A-Level was spent studying.

Using research...

The most obvious way of using research is by direct association with the theme. Again using the idea your project is about dogs as an example, you should search through journals and books constantly always keeping an eye out for images or articles on dogs for possible use in conjunction with your work. If that's not an option or you've done that and drawn a blank, you might then search my list of photographers and found a few photographers that use dogs as a theme within their work. That's a direct approach and for the most part that should give you enough info to work with, but there is another way that might be useful, especially if you're photographing a theme that is obscure.

Indirect association research...

Keeping with the dog theme... you might have found some direct research either from my list or better still from a journal that you've decided to use. But, because you were using journals you also accessed so much more photography by the process or perusing the magazines and journals and in between looking for the dogs a number of other photographers caught your eye simply because of the way their images looked. For instance you may have seen the work of Don McCullin...
 
 Whilst this has nothing to do with the dogs project directly, it still may be worthy of a place amongst your research. You may have stopped at this image in the magazine simply because of the starkness and the mood evoked by a number of visual language elements within the image? Having looked at some of the specific dog research material, you may have got lots of ideas and were able to analyse the work of the photographers. But, you can do the same with indirect subject matter such as McCullins image here...
 
"Looking through the BJP's for dog photographers, I came across the work of Don McCullin. Whilst it doesn't feature dogs, I love the way that he produces these images and the stark effect he produces in his prints and it might be something I could consider incorporating into my own dog images? My dog project to some extent might explore the more menacing aspects of dog ownership and the relationships people have with their dogs and therefore this approach here that McCullin uses might offer a way in which I can evoke more negative connotations through the use of visual language".
 
As a student you could then (as advised) produce a high quality image of McCullins and then go through the process of deconstructing it and analysing it using the prompts on the Visual Language Analysis page add a few more smaller images to support your observations relevant to your intentions. Have a look at the interviews on Youtube, listen to what he says about his photography, look at the transcriptions of any interviews that are published on the internet (Search Google using "Don McCullin + Interview"), he's virtually guaranteed to say something about why he takes pictures that has some resonance with what you're doing - use some of this as quotes within your research ensuring you record the source in your bibliography.
 
Then towards the end, when you've identified that you've established as much info as you need to on McCullin, bring it back to your dogs (Or your theme) and reiterate the connection and how you're going to use aspects of McCullins practice in conjunction with your own work.
 
Other aspects that might drive your work forwards towards that A-Grade is the fact that through your research you might identify that for the most part his work is recognised for his war photography. You might discover that he uses a particular type of film... That then might lead you to conclude...
 
"Having looked at McCullins work in more depth, I understand that it's all shot on 35mm cameras much like the Pentax K1000's we use here at college. I've been inspired by this work and it's made me want to try and shoot my project in this way using film. Having spoken to our lecturers they say one of the most popular choices of film for this kind of approach is Kodak Tri-X Pan, so I'm going to try that out and see if I can get this affect..."
 
Which means your research (As intended) now gets you to start experimenting with new and exciting approaches to producing images - picking up on increasing amounts of learning outcomes as you go!


Friday, 24 February 2012

Section 4 - Research

http://www.listofphotographers.blogspot.co.uk/

Here's some ideas on the theme of your research...

Research (Also check out this newer link on research here)

Right from the very outset we will be advising you to look at contemporary and historical photographers primarily exploring their ideas and reasons for shooting their images in the manner that they do. We strongly advise that you do not use the Internet as your starting point, as this tends to produce superficial and weak research material. The advised approach that we'll introduce you to, is to use Photographic Journals such as the BJP, allocating a little time each week to look at the new issues of each of the magazines and getting ideas together and gradually building a knowledge bank of contemporary and historical photographers and their work.

Using this approach you would be introducing yourself to a very broad range of photographic approaches and establishing a far greater depth and understanding of photography's potential. You should make notes and photo-copy interesting images and articles and get to grips with the language used and the ideas and concepts that are explored through photography.

We cannot stress how important it is to use the resources in the library (Journals, magazines and books). By virtue of being published in hard copy, the information in the articles is written by professional editors, writers, reviewers, academics and other artists and therefore of a much higher calibre. The nature of the articles in the magazines, books and journals tends to be far more concise and to the point, addressing all of the necessary components of your own research.

Your research should be conducted in two forms... (1) Initial Research (2) On-going Research.

(1). The initial research under-pins the project and should be the element your work is based on and around. We suggest that you explore 3 artists that connect with your idea and as part of that process you would ideally make a decision about your idea quickly connected with one or more of the artists/photographers you research. This part of your research has to be done at the start of your project and this is the reason we advise you to be continually looking at contemporary art photography throughout the course and building up a knowledge bank of sources to which you can turn to and use in conjunction with your work.

Throughout the duration of the course you're expected to experiment with your images using experimental in camera and post production techniques to enhance the meaning behind your images. One of the more difficult aspects of this is, the fusing together of your concept and the experimental approach. In order to increase your chances of being able to unite the idea and the experimental approach is to have a very wide appreciation of photographers that use these approaches and their techniques and how they use them together. This knowledge will only be gained through studying and researching contemporary art photography (The journals in the library) and seeing how and why they do it.

When you're looking at artists associated with your theme/approach the key things you need to identify are...

  • What is their work about (Its meaning)
  • How is the meaning conveyed in their images
  • If they use experimental techniques/approaches within their - work how does this enhance the images
  • Who are they influenced by - show how/why
  • Is their work a part of a continuing tradition
  • Where and how are their images used
  • What influences you are going to draw from their work
Use one A4 'Key' image in full colour, as high quality as you can source. Annotate this image identifying the Visual Language used in the image. For each artist aim to write in excess of 300 words describing the above bullet pointed aspects. Add additional images (In colour) to illustrate any points that are important and use quotes from books and journals in addition to the 300 words.
 

Then compare and contrast the work of at least 2 of the artists that you research again looking to write another 300 words,
 
·         What is the idea/concept behind the artist/photographers work?

·         Read the articles and look at the images – what is the work about, see the list below describe how it links in with one of these or another and say why the artist or you think it’s important or interesting.

o   Self

o   Space/places

o   Time

o   Religion

o   Sex/gender

o   Society

o   Conflict/War

o   Family/Kinship

o   The mind/mental illness

o   Violence/crime

o   Disease

o   Politics

o   History

o   Nature/environment

o   Confusion

o   Escapism


·         What materials, techniques and processes are used and why?

·         How big is the work – scale and size, how might this affect the way that it’s perceived?

·         Over what period was the work made – is this relevant?

·         Where are these images seen and used – how are they used – what’s their purpose?

·         Who or what is the work influenced by?

·         What’s been said about the work by art critics, curators, reviewers and other artists?

·         Is the meaning behind the work “Obvious”  or “Ambiguous”?

·         Have you been able to grasp the meaning behind the work – what do you think about it?

·         What have you taken from the research and applied to your own work (Idea/Concept or Practical/visual) elements?


 If you're struggling with ideas/concept based photography, have a look at this video as it may help... (
Photography as contemporary art)

Once you've made a start on the research and you've looked at some contemporary photographers and their work that has some link with your initial idea. You need to now outline a plan - what you're going to do next...