Sunday, 15 December 2013

Recommended Books for your course

(1). Photography The Whole Story (Hacking and Campany).
 

This book comes highly recommended because of the way that the information is laid out and concise nature of the each of the photographers and themes covered
 
Each of the themes or photographers are dealt with in a similar way, with a basic outline relating the photographers work/subjects/themes etc. Many of the pages include (as below in the Horst P Horst section) the "Focal Point" notes which are useful for students in that you get some sense of what could and should be analysed and considered within an image. 
Genres are covered as one of the theme elements within the book, and these come with a time-line at the bottom of the page contextualising the photography with the coinciding historical events.
 
Overall the book is great for basic information and giving you a feel of why the photography is seen as influential, innovative and important, all of the things that you need to be discussing within your projects in conjunction with your research.
 
If reading books isn't your thing and you just need to find the photographer that shoots a specific theme/subject - use my list here to find the photographer you need by searching by theme/subject.
 
(2). Photography Portfolio - (John Ingledew)
 
For the more practical elements of the course, how to do stuff and what to use and why and how it works, you should use this book - http://www.amazon.co.uk/Photography-Portfolio-John-Ingledew/dp/1856694321#customerReviews check out the reviews. To be honest it's not one that I own myself, at the moment I would recommend this one here, but I've ordered Ingledews 'Portfolio' a moment ago and once I've got it I'll update the blog, but it is highly recommended by my colleagues and the people that review it on amazon.
 
(3). The Photograph as Contemporary Art (Charlotte Cotton)
 
This book is a must for names, genres, ideas and concepts. The book is broken up into several sections which can be read in isolation. Each section deals with a type of genre and discusses the work in very concise terms giving you the basics leaving room for further and deeper research if required. The magic of this books is that it connects photographers, detailing who inspired who and leading you to new avenues and approaches. Concepts and ideas in photography as an under-pinning factor in the way that you approach your photography are fairly unique to FE and HE education, so this book gives you a really useful insight to this way of working with your photography.
 
 
(4). Langfords Basic Photography (Michael Langford).
 
As it says on the cover "The Guide for serious photographers". This book focuses on the actual doing, materials, techniques, processes and equipment aspects of photography. Back in the day if you were doing a level 3 course this was your bible and at the end of the 2 years you'd have absorbed most of what was in this book. For students looking to attain high grades - Merits, Distinctions, B's and A's, this is the book that will fill in for your lecturers inadequacies!


Saturday, 14 December 2013

Approaches to producing images - Typology

http://www.listofphotographers.blogspot.co.uk/

Typology (Work in Progress)

This is one of the approaches we cover and teach you about.


Typology is an approach where you focus on 'Types' and produce a series of images in sets, often presented as a composite on one single piece of paper, e.g. an A3 print with 9, 12 or 15 images or more. Alternatively the images can be produced singularly and then displayed as a set at the end of a project.


Within your longer projects, whereby you have to explore and experiment with different approaches in producing your images, this is one of the approaches that you can evidence in your work that has excellent opportunities to link with high quality research that evidences key points in Photography history. Typology also allows you to discuss several other elements in conjunction with the images/approach. If you look at Bernd & Hiller Becher, this will allow you to explore and discuss Objectivity Vs Subjectivity maybe linking with Deadpan and other artists such as Thomas Ruff and looking at the links his work has with Photobooth images and the imposition of a set of rules that takes the subjective elements out of the image taking process.


Other artists that you should look at directly linked to Typology are James Mollison and two of my Favourites Jeffrey Milstein and Alejandro Cartagena.


Jeffrey Milstein (Planes).
 
 Jame Mollison (James and Other Apes)
 
The images here all use relatively simple approaches with the exception of the Bechers, the Bechers would have used 10x8 view cameras, film and darkroom approaches. Similarly you have to make decisions as to whether you want to keep things simple and produce the work at the experimental phase using your digital cameras, but once you've produce your work in a number of different ways you might consider shooting your work using the Typology conventions and perhaps explore producing it with another experimental approach, or use film and Darkroom/analogue techniques.
 
Pinhole camera (As a Typology)
Mixed Media (As a Typology)
Liquid emulsion (As a Typology)
Images & Text (As a Typology)
 
All of the artists mentioned here have either been featured in recent Journals or have Youtube videos where their work is discussed and explained by either the artists or someone qualified to do so.
 
In terms of difficulty, this is a relatively easy approach with the potential to produce visually interesting outcomes that meet a great number of your learning outcomes required to attain the higher grades. Needless to say at the end of any work that you produce around the theme of Typology you should then reflect on the work that you've produced and consider it as a possible method of producing your final body of work. Because of the potential of Typology and the fact that it can be easily mixed with a range of different approaches, this could also be the main thing your project could hinge around and explore and could easily serve as your starting point for any independently led project?
 
Additional photographers that work using the Typology approach can be found here - http://www.listofphotographers.blogspot.com/


Friday, 13 December 2013

Recommended web links


This is probably the best photography website ever...

www.americansuburbx.com  check out the 2 tabs at the top 'Artists' and 'Browse'.

Dazed & Confused on-line presence?

http://www.dazeddigital.com/photography/article/17626/1/low-and-behold

Learning resource for higher order thinking skills (Generic)

http://www.in2edu.com/resources/thinking_resources/blooms_taxonomy_chart.pdf

This is a useful link to a blog compiled by a lecturer at a college in the UK

http://artandphotography-uog.blogspot.co.uk/

Sean O'Hagan at the Guardian

http://www.theguardian.com/profile/seanohagan

Massive list of Photographers searchable by theme/subject/content especially useful for students.
http://www.listofphotographers.blogspot.com/


Monday, 9 December 2013

List of Photographers and their themes

Whoa! The list has gone!!!

No it hasn't, it's just been updated and improved just click the link below...

http://www.listofphotographers.blogspot.co.uk/

If you've been re-directed here via a link in your assignment click on the link above. Once you're there use

CTRL + F to find the name of the photographer you were interested in. Once you've found the photographer, there should be another link to a high quality resource for your research.

Wednesday, 4 December 2013

Experimental/Alternative approaches in Photography

(Work in Progress). Here's a list of suggestions of a variety of different ways you could approach your work moving it away from purely digital and straight photography approaches. On your A- Level there is a requirement to explore a range of different and experimental approaches within your work.

Mixed Media - Victor Sloane, Peter Beard,

Subjective v Objective

Pop Art  - Julian Opie, Andy Warhol

Expressionism - Ernst Haas, Alfred Stieglitz (Equivalents),

Impressionism

Abstract

Minimal

Narrative

Voyeuristic - Merry Alpern, 2,

Deadpan - Tereza Vlckova Thomas Ruff, The Bechers,

Typology - Bernd & Hiller Becher, Jeffrey Millstein,

Topography

Pinhole - Barbra Ess, Gina Glover,

Tilt Shift - Slinkachu

Liquid Emulsion - somebloke

Cyanotype - Anna Atkins, Wig Sayell,

Repetition Andy Warhol,

Degrading & Damaging - Ed Burtynsky (Chittagong Polaroids), Sally Mann

35mm & Darkroom techniques -

Abstraction

Joiners - David Hockney

Images & Text - Peter Beard

Found images -

Comic Book - Sin City, Ah Ha (Stand by me video).

Colour - Evzen Sobek a life in Blue

For more check out the list of photographers - CTRL + F and search "experimental" http://www.listofphotographers.blogspot.com/

Monday, 18 November 2013

Gibbs reflective practice in Art & Design

Why use the Gibbs reflective practice model to write up your written responses to your work?
(Updated Nov 2021)


The reason we recommend you write up your work in this way is simply because it steers you to produce written content that meets the assessment criteria. Almost all photography courses will require written evidence that supports your practical work. Using this simplified version with 5 prompts, based on the Gibbs Reflective Cycle brings structure to your work flow whilst at the same guiding you to write the type of content that meets the assessment criteria.

 When should you use it?

Currently (2020) my students have to use it in key areas of their work during the Creative process. They have to use it once they have completed their research: Reflecting on the research, explaining and analysing what they have learned from the research and how this will inform their initial practical response. For example- what aspects of the research will they carry forward into their own work. This may be as simple as using the same light as the artist that they've looked at, or perhaps being informed by their idea/concept? 

This then leads into producing an action plan - this serves as the plan or proposal for their first shoot/practical activity. 

Thereafter, they have to use the Gibbs model to reflect on all of their practical activities. Photo-shoots, Printing sessions in darkrooms, Photoshop sessions and any activity that involves any significant new learning. 

With practice, the Gibbs reflections become the only large written components of their work other than the research at the start of the project and the final evaluations. This approach,  tends to cut out the propensity to waffle and encourages more relevant and targeted written responses that meet the Unit criteria. 


The  5 Prompts 

What Happened - Describe what you’ve done/not done. (Keep this relatively short).

Feelings – How do you feel your doing are, worried, confident, confused? (Keep this relatively short).

Evaluation – What value is there to having produced this work, why has it been a useful in your learning? (Keep this relatively short).

Analysis – Involves questioning what you have done in order to explore better ways of working and or to produce better quality outcomes that meet the criteria... What have I learned; What more do I need to do to improve, why has the activity been useful and importantly use a what if?; question to explore a different way you may have produced the work, that would have been better. 

Action Plan – What will you do next - when, why, where, who with and what for? Also identify what you'll be using in terms of equipment, media, materials, techniques and processes as part of your plan. Other things you can use include lighting/floor plans and reference images. 


*Note I no longer insist on the students writing up the conclusion part as more often than not they'll draw conclusions in the analysis section. So for us the conclusion component is optional.

Studio Stuff - Basics

Studio basics (For inspiration & ideas check out http://listofphotographers.blogspot.co.uk/ )

Here's some guidance regarding using the studio.

Equipment - The list here is broken up into 2 sections the first part is a minimal approach and the second section is my recommended full list and the third section is for 'Hardcore' serious students that are seriously interested in learning Studio lighting techniques.

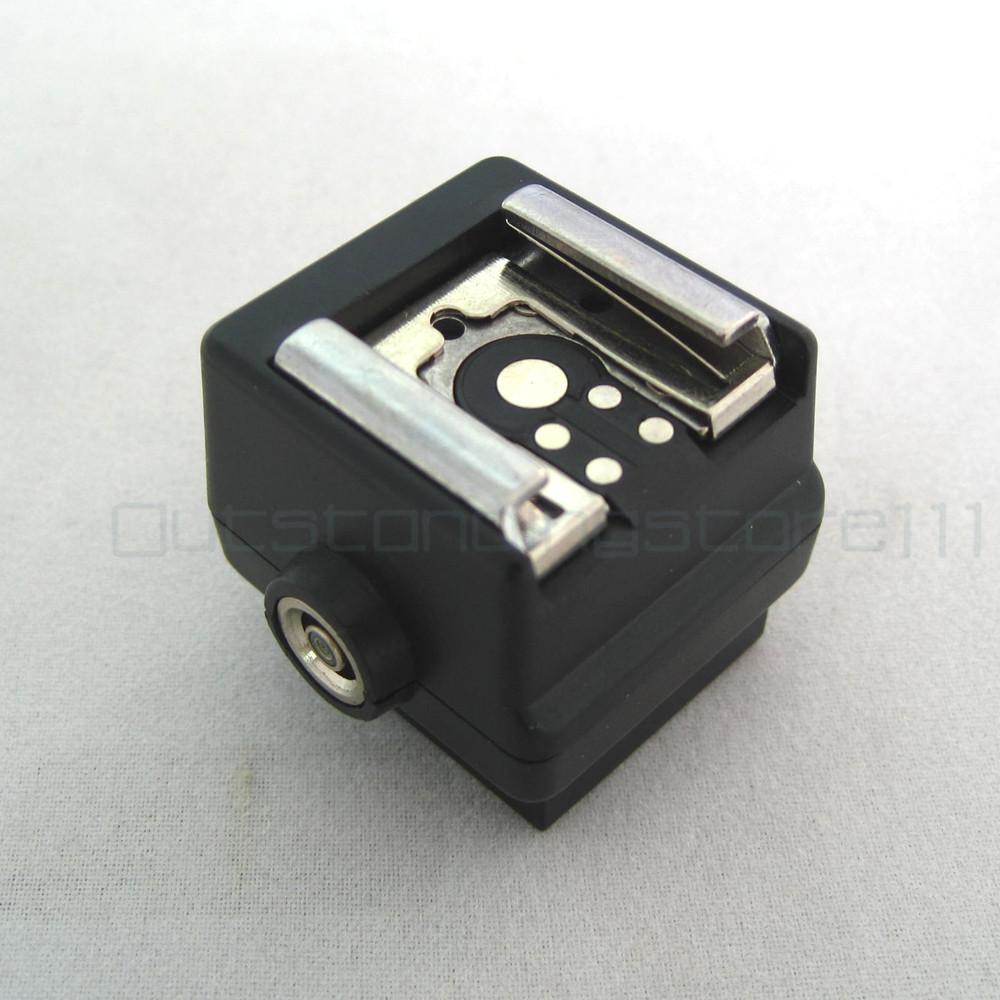
  • Hot shoe adapter
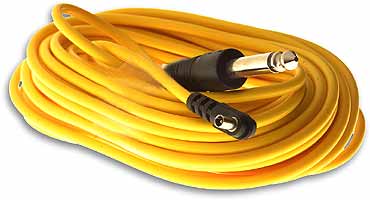
  • Sync lead x 2
  • Sekonic L308 light meter
  • Tripod adapter
  • Tripod
  • Camera
  • Lens with focal length of 55mm or longer


  • Tool box - Pliers, wire, screws, blue tac, string, fishing wire, a range of tapes, long nose pliers, nails, bulldog clips, crocodile clips, pegs, drawing pins,

Work in Progress Sekonic L308 flash/light meter.


 Basic set up in the studio.
 
You need to set your camera up ready so that it's configured for studio use...
 
Set your camera to Manual
Set your ISO to 100
Set your white balance to Flash
Use a focal length between 55mm - 70mm (DSLR)
Set your shutter speed to 1/125 (DSLR)
Consider using Manual focus
 
Now configure the Flash Meter for use in the studio...
 
1. Set the Invacone so that it is in the position as in the image above (e.g. covering the sensor). The invacone is the white dome on the front of the flash meter.
 
Starting at the top of the meter - press the power button and the LCD display will come on.
 
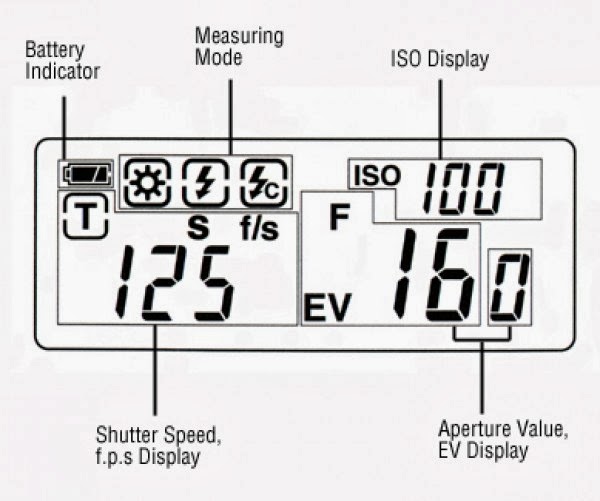
2. "Mode" By pressing the mode button you will see the that the 3 symbols next to the battery power symbol (Top left of the display) are highlighted by a box appearing around them when they are selected. Select the 'Flash Cord' mode e.g the one with the flash symbol and the letter C.
 
 3. "ISO" On the front of the meter is the ISO button, press this and hold it down whilst pressing the 'Up' and 'Down' arrows on the side of the meter. You'll see that the number next to the word ISO on the front right hand side of the display changes, this will need to be set so that it corresponds with your cameras ISO e.g. 100.
 
4. "Shutter Speed"; Using only the Up and Down buttons on the side of the meter watch the number next to the T symbol on the left hand side of the display. Adjust these numbers so that they are set to the same shutter speed as your camera e.g in this instance 125.
 
The meter is now calibrated and ready to go in conjunction with your camera being set up per the instructions above.
 
Once you've done this, arrange your lights in the manner you desire. Then using the flash meter, make an 'Incident' light-reading. (With white dome in place).
 
Plug the synch lead into the hotshoe adapter and the flash unit/head...
 
The Measurement of the light


The basic principle is - you measure the light that is falling onto the subject. This is the "primary" light source, you may introduce additional lights at different stages and the light readings will become more complex. So, in the first instance use one light and take a reading for that scenario.

Hold the light meter close to a key element of the subject. In the example above, it's a portrait, so the light reading is primarily for the face. Therefore hold the light meter almost touching the face (if not actually touching the face) and press the trigger button on the side of the meter at the top. This will trigger the flash and the light meter will register a light reading in the LCD panel next to the F (Largest number in the display). This will be the light reading measured in aperture values F2, F2.8, F4, F5.6, F8, F16 etc.

At this point you make a decision as to what aperture you want to use. Do you want limited minimal depth of field or maximum depth of field? Normally with a portrait, you want as much of the person in focus, so you would normally opt for an aperture of F8 or F11. These are also normally selected because your lens works best at these settings.

Get your assistant now to make the adjustments to the power output of the flash head, whilst you make the light readings.
 
 Using the dials on the side of the flash unit, your assistant makes adjustments either increasing or decreasing the power output. Each time they make an adjustment...
 
"Increase the power by 1 stop" They should dump the charge manually via the discharge button on the flash head before you make the next measurement. You make these adjustments until you get the required light output that you're after say for instance F11 (Which will be displayed as the F number on the LCD panel on the flash meter).
 
Warning - You have to ensure the reading is correct, the F number is recorded in whole values e.g f 8 and 1/10th values e.g. f 83. It is important that you are aware of these tenth values and that you adjust the lights accordingly and you're advised to work with whole values when you're learning the basics.
 
Don't stand in front of the light when you're measuring the light.
 
Once you adjusted the lights and they're giving you your reading of F8 and you've checked it, the model will have to stay in that light zone, if they move closer or further away the light reading will change because of Inverse Square Law. Keep control of your models make sure they stay on the same plane of focus, make a mark on the floor and ensure they stay in that zone. If they have to move around you will have to adjust the lights again.
 
Now set your camera to F8 and away you go!